Climbing is usually pushing your limit upward until you have reached the summit of your target or cherished mountain. In this process, your raw strength, mental stamina, climbing skills, and minimal use of climbing aid are involved in overcoming glaciers, walls, ridges, and other obstacles the routes are strewn with.
But the reality is there are many tough routes to the cherished mountain peaks that put a stop to your upward march, whatever strength, stamina, skills, and exposure you have. A new climbing style called aid climbing has emerged in alpinism or mountaineering. That is relatively slower compared to free climbing but a surer technique to push your limit upward until you reach atop through the routes previously deemed impossible to climb through.
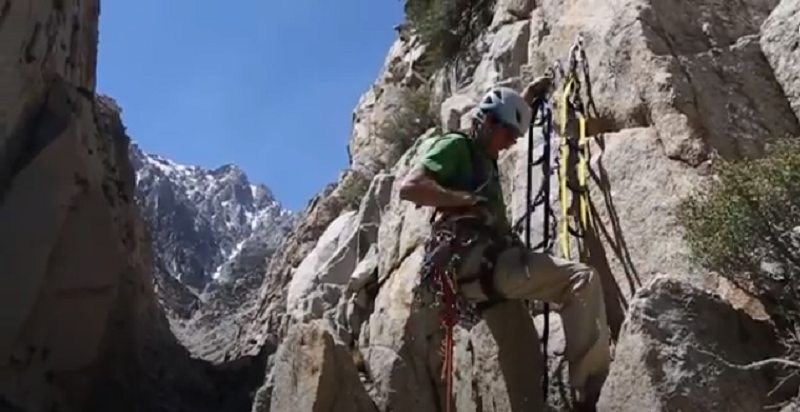
Obviously, you need artificial equipment – aid climbing gears or aids- to make safer holds while climbing as the given holds or a lack of them throughout the routes either are not of any help or are never attempted by free climbers.
But it would be a blunder to downplay the climbing style under discussion to be merely gear-aided. In fact, you require great physical fitness, strength, climbing skills, and rigorous preparatory training on top of the aids. Here you have a beginner guide to help you get started with aid climbing.
What is Aid Climbing?
As the name suggests, this refers to the form of climbing where the climber utilizes a plethora of devices to support his or her body weight as he or she scales up a mountain. The crucial gears used here include nuts, hooks, daisy chains, step ladders, fifi hooks, pitons, and so forth.
Aid climbing is actually a lead climbing method for climbing lengthier and tougher rock surfaces or walls with the help of artificial holds, replacing the tough or impossible-to-get-through holds or absence of them in the routes. To rephrase it, it is rock climbing through challenging routes made easier and possible to get past by using climbing aids – multiple gears.
Sometimes, these aiders are used in other climbing forms such as sports or even traditional climbing. As the climber ascends a mountain or a rocky hill, he or she will place the cams and nuts into the existing cracks to remain safe in case they fall.
Here, the climber will hang on each piece instead of the natural holds as they proceed or ascend the mountain. Although this form of climbing might seem simple on paper, you must adapt at using all the equipment in the aid climbing gear list by preparing adequately, knowing the right route to use, and so forth.
Why Do You Aid Climb?
By now, you know what aid climbing is all about. However, one question that might be lingering in your mind is why to engage in this form of climbing. Well, aid climbing is ideal for difficult pitches for free climbing. These include routes that are too steep or those that are too long. In fact, if a certain route or pitch needs more endurance and mental stamina, aid climbing is the alternative alpinism/mountaineering safer and easier for alpinists to get down.
Routes that are too steep or vertical can become easier and safer when approached by aid climbing methods. The subtle difference between aid climbing and free climbing is the safety guaranteed in aid climbing in the event of a fall from difficult holds. Some aid climbing-only equipment offers this safety or ease in holds.
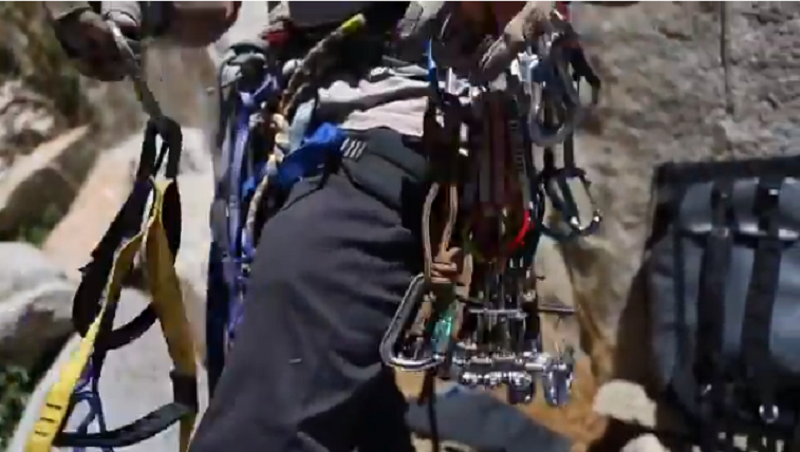
Basic Aid Climbing Gears at a Glance
As the previous section concludes, there are crucial gears to make a tougher road viable to climb. If you want to aid climb a certain mountain, there is a set of equipment that you must have at hand. In fact, most of the equipment is the same as that used in free climbing. The only noticeable difference is that the aid climber must have some aiders. As for style, this form of climbing is largely gear-intensive, while free climbers use gears at need. Here you go with the crucial gears that you must include in your aid climbing arsenal:
- Properly Broken-in Rock Climbing shoes
A pair of comfortable rock shoes is basic because you will stand in aiders for longer. Consider wearing a pair of high-quality climbing socks to ensure enhanced comfort and avoid getting hurt.
Ideally, your pair of socks may be thick or thin, but your climbing shoes with the socks worn must fit snug and be breathable. In addition, ensure that your climbing rock shoes have sticky rubber soles for improved traction with the rock surface.
If your shoes have worn-out soles, get them resoled professionally or on your own with the help of climbing shoes resole kit. Besides this, they should offer the much-needed arch support, so aggressive rock climbing shoes should be a preference here.
-
Climbing Rope
Ideally, your climbing rope should measure 9.5 to 9.8 millimeters in thickness. With this rope, you can be sure that you will remain stable even at a high point. This means that the rope, not adequately thick, is likely to snap and thus lead to your fall. You may need an extra climbing rope to uplift food, beverage, and other essentials.
As for safety, ensure that the rope is not brittle and has not gone unusable while the storage for the whole winter. Only properly stored rope can remain suitable for further use.
-
Climbing Helmet
A rock climbing helmet is a safety gear but is crucial to avoid getting hurt by rock debris falling on your head as you ascend the mountain. Thus, your head will be safe from the loose rocks and bad weather in case it rains, or there is some hot sun. If and when a helmet guards your head, a fall may not prove to be too grave.
-
Belay Device
Your belay device should have locking carabiners to manage the tension and slack of the climbing rope. Since your life as a climber relies on the belay device, there is a need for you to get one from a reputable brand. Petzel offers superior quality belay devices, and they have a self-belay machine to offer when you are self belaying.
-
Climbing Harness
Ideally, you should choose a harness that can easily be adjusted to be comfortable as you ascend the mountain. Besides this, the harness should be strong enough to support your weight. More importantly, ensure that it has gear loops. Ideally, it should have 4 gear loops so that you can rack other gears such as carabiners, racking cams, and so forth.
Finally, ensure that you have a runner-strength haul loop at the back as you might need to tow an extra rope behind you and a rappel loop or belay on the front. And you can make a harness out of webbing on your own.
-
Quickdraws
Typically, the quickdraws allow you to attach the climbing rope to the anchors. As a result, they protect you as you scale up the mountain. Knowing in-depth about the types of carabineers can give you the necessary exposure to quickdraws.
-
Ascenders
These gears usually clip into the climbing rope, thus allowing you to scale the mountain vertically in a straight line. Ascenders vary in types and function; you better master the art of using ascenders efficiently.
-
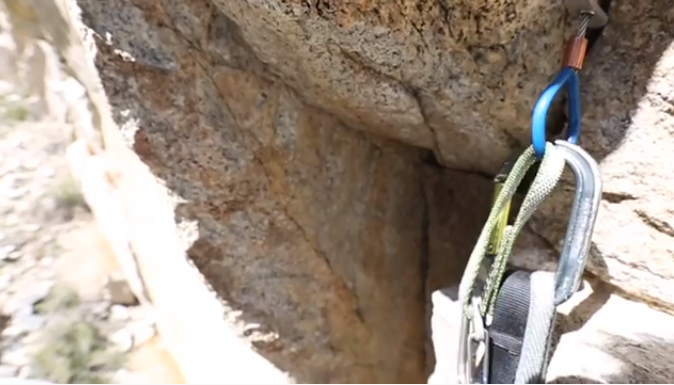
Aiders
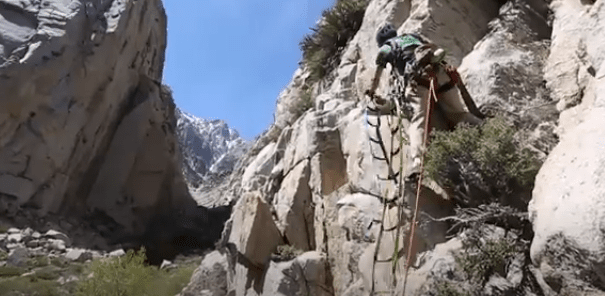
One element that separates aid climbing from free climbing is the use of aiders. Simply put these are webbing aid climbing ladder that enables you to climb or scale up a mountain seamlessly. Here, you will be standing on the ladder’s steps and scale them up to get higher until you reach your desired summit point. Most aiders usually come in two main designs. These include;
- Entries
- Conventional ladders.
The conventional ladder aiders resemble a typical ladder that is used at home. However, this one features or comes in a series of fabric loops fixed on each side using support pillars. Thankfully, these ladder aiders come with a spreader bar that helps to maintain the fabric loop always spread. As a result, you will not have to reach down using your hands to make way for your feet.
However, some models come without a spreader bar. A good example is the Metolius 8-step ladder. If you have to use this ladder to scale up a mountain, you must first be well-trained.
Although you might use the aid climbing ladder or aiders to ascend a single pitch, it can be quite heavy to utilize. In fact, you might face several challenges if you have to engage in multi-pitch climbing. If you have to climb a multi-pitch route, consider using the etriers.
It is imperative to note that the etriers usually have one support pillar at the center. You will find the climbing loops at the sides, making the ladder look like stacked triangles.
Unlike its counterpart, this one does not need a spreader bar as its design does not allow folding. Since this aider features crooked loops, be sure that the aider will not be comfy in case you take a lot of time to attach the fixed pieces into the cracks you will find on different walls.
-
Daisy Chains
Apart from having the aiders mentioned above, you must have daisy chains during aid climbing. During this form of climbing, you must have left and right daisy chains.
Thankfully, these chains usually clip to the top of each aider. In most cases, they usually serve as an anchoring system whenever climbing up a mountain. Since they are two, be sure that you will enjoy a dual anchoring system. Here are other roles that daisy chains play during aid climbing:
- They help you to ascend a fixed rope using ascenders
- They prevent the climber from falling in case he or she does not have a safety anchor that connects him or her to fixed pieces.
When purchasing daisy chains, you consider choosing models that are not too short. This way, you can adjust them to the length you please and be good to go.
-
Fifi Hook
Typically, a fifi hook refers to a metal hook that connects the climber to the harness directly into the gear you are standing on in your aiders. Ideally, the fifi hook should neither be fallen on nor come into contact with a rock surface.
With this aid climbing hook, you can attach yourself to waist-level gear placement, thereby removing your weight from the climbing rope and the belayer. If you have to aid climb on an overhanging rock, consider using this equipment, and you will be good to go.
-
Essentials
Besides the gear mentioned above, you need extra equipment such as:
- Belay gloves
- Topographical maps
- Guidebooks
- Climbing chalk
- Chalk bags
- Haul bag
- Rope bag
Aid Climbing: What & How to Do
Since you already know about all the equipment the aid climbing gear list should include, the time is ripe for you to adapt to using the gears through practice under professional instructions. Thus, how you should get started with this form of climbing. After mastering the basic climbing skills and techniques and completing the practice session, you are good to go.
The climbing call expert team has divided the aid climbing guide into two sections: mastering the crucial rock climbing skills through practice and following an informed aid climbing sequence. If you are tempted to know the sequence, here it is:
- Place the Gear Where Needed
- Test It
- Release Your Weight onto it
- Clip through the Gear Placed Earlier
- Top-step as High as Possible
- Repeat the Process
The steps in detail:
-
Fix Your Gear into Place
The first step in aid climbing is to place your gear in place. After that, attach your body to it using the aider you are not standing in. More importantly, ensure that you clip as high on the piece as possible. By doing so, you will be able to gain more height and thus will not need to make several moves to reach the top.
As you clip your gear, you can first clip a quickdraw and then clip the aider onto it. Doing so will ensure that you have clipped it as protection before you remove the aider. Thus, you will not be detached from the piece whatsoever.
-
Ensure Your Gear is Working
Once you are done with the first step, the next one is to ensure it is working fine. When it comes to testing your gear, you can either do it practically or by using your eyes. If the gear has been used in the past, consider conducting a bounce test before you can utilize it.
By conducting a bounce test, you will be exerting more force than your body weight to establish whether it can withstand your weight or not. In case it performs well, you can proceed to the next step. On the other hand, if the gear fails the bounce test, you might have to reconsider your decision and look for better gear. Remember that the safer you are, the better your aid climbing experience will be.
-
Get Started
Once you are convinced that your gear is okay, you can commit to it and shift all your weight onto it.
-
Reset
During this stage, you will be required to reach down and clip the climbing leading rope into the lower piece before removing the aider. If you are using adjustable daisies, you need to extend them and then clip them to a gear loop in readiness for the next placement.
-
Top-step as High as Possible
Going a notch higher on your top piece only means you will not make many moves to reach the top. If you are aid climbing on a slabby terrain, you might have to utilize the steps of your aider to move upwards. As you scale from one step to another, ensure that you hold onto the existing rocks to maintain the much-needed balance.
As you climb, the daisy will slide up its carabiner’s back bar. For optimal results, ensure that you adjust the daisy well so that it can generate the much-needed downward tension. This way, you will be able to maintain some level of balance. In fact, if you lose your balance, you can trust that you will not fall the entire length of the daisy.
On the other hand, if you are aid climbing an overhanging or vertical terrain, be sure that the whole experience might not be enjoyable per se. Generally, scaling up such terrain is strenuous.
In this case, you should scale up your aiders and cinch the daisy tightly to create the much-needed downwards tension. Once you reach your highest point, find another placement and repeat the process as illustrated above.
-
Repeat the Process
Here repeat means to redo step one until you reach your destination – be it the next belay station or the top of the rock wall.
Fixed Aid Climbing Vs. Free Aid Climbing
To start with, it is imperative to note that aid climbing started in the 1900s when people were curious to explore different mountains for the first time. During this time, available aid tools were pitons. Since these pieces could hardly be relocated or removed once fixed, climbers then had to carry several pitons whenever they ascended higher pitches. Thus, the term fixed climbing has come into use.
Over time, Yvon Chouinard brought a paradigm shift into the world of climbing by introducing climbing items such as nuts and cams. Compared to the pitons, these were relatively lighter and thus could be carried over long distances and be relocated if needed.
Thankfully, this climbing equipment did not leave any permanent marks on the wall one intended to climb. As a result, climbers could enjoy climbing not-tampered routes and have unlimited fun. This led to free aid climbing as nowadays; climbers use nuts and cams to climb different pitches.
Aid Climbing vs. Free Climbing
As the name suggests, aid climbing involves the use of gears to ascend upwards when one is climbing a mountain. However, free climbing entails using raw physical strength and mental ability to ascend a certain mountain or climbing wall.
During free climbing, you are allowed to use a climbing rope to avoid severe injury in the event of an accidental slip accidentally scaling up a mountain. Technological sophistication over time has improvised the basic climbing gears that were unthinkable before. So, equipped with those improved tools and gears, a free climber now a day also can take up the challenge of the routes once deemed safe only for aid climbing.
Having said that, in free climbing, the gears are mere auxiliary tools to help make the process easier. Whereas aid climbing is entirely based on the masterful use of the aiders, discussed at length already, it deserves special mention. And this is the tool meant only for aid climbing.
There is a tendency among veteran free climbers to underestimate aid climbing, and the underestimation has gone to the extent of blaming the latter for polluting the free climbing stream. Not to be deterred by such derogatory comments, aid climbers have responded by summiting peaks through tougher and difficult routes, thus paving the way for free climbers to use those routes.
Understanding Aid Climbing Grades
In a bid to make aid climbing a success, climbing professionals came up with a universal grading system. With this grading system in place, be sure that you will be able to know how difficult a certain route is, among other details.
Digits and letters usually characterize the aid climbing grading system. Here, you will find letters from A to C, where letter A shows routes that need one to use pitons while its counterpart shows the exact opposite.
On the other hand, the digits denote the degree of difficulty one is likely to experience once he or she chooses a certain route to climb through. Here you the aid climbing grades briefed for your better understanding:
AO/CO:(French-free climbing): You do not need to use many gears. In fact, you can ascend them by pulling or stepping on pitons or any other fixed piece.
A1/C1: If you choose these routes, chances of gear detachment are next to naught.
A2/C2: These are moderate routes where gears might detach at some point. However, even if you fall, you can trust that you will remain safe.
A3/C3: These are hard routes. Unlike other routes, placing your pieces here will be an uphill task, and the chances of falling are very high.
A4/C4: These are complex routes and thus might need more time. Once you fall along these routes, you might sustain severe injuries.
A5/C5: These routes hardly protect the climber in case he or she falls. In this case, a fall can be fatal to say the least.

Crucial Aid Climbing Tips
Some of the vital aid climbing tips that you should consider include:
-
Take Note of How Difficult a Certain Route Is
Before you commence your aid climbing adventure, you must note how difficult a certain route is. For instance, if a certain route is graded as A4/C4, be sure that the route is generally difficult and might need more time. However, if the route is labeled A0/CO, be certain that the route is easy to climb and you might not need many gears to reach the top.
-
Know that aid climbing can be difficult, despite having gears
Even if you have gear, be sure that aid climbing is not a walk in the park. Such is the case if you have to climb steep routes. More importantly, give all the routes the respect they deserve, and you will be good to go.
-
Keep in Touch with Your Fellow Climbers
Besides the ideas mentioned above, there is a need for you to keep in touch with your fellow aid climbing partners. In most cases, one climber ascend, and the other works as a belayer. For optimal results, ensure that you keep in touch with your partner so that you can remain safe and motivate each other along the way.
Aid Climbing Summed Up
It is no secret that aid climbing is a gear-intensive form of climbing. From the climbing shoes to the aid climbing ladder or the aiders, there is a plethora of equipment that you must have at hand so that you can have a smooth climbing experience. More importantly, follow the process as we have discussed above so that you can reach the desired point.
Finally, take note of the aid climbing grades mentioned above so you can know how difficult your preferred route will be. Consider all the ideas we have discussed above, and your aid climbing experience will be unique and fun-filled.