Giving climbing shoe resole kit a try or seeking a professional resoling service is a heated debate when the stake is to mend the worn-out or overworked climbing shoe sole. Beyond any doubt, the sole is the most used and abused part of climbing shoes that gives in to tear and wear earlier than the other parts.
In fact, the sole is the area of your climbing shoe to bear the stress of your foothold on rock, strewn in the climbing route, cause. It has to withstand the friction to get you climbing across the rocky mountain terrain and leaves a tiny portion of it stuck to the rocks it has landed heavily on in the course of climbing. Thus we have a worn-out climbing shoe sole while the climbing shoe rand and the upper or climbing shoe toe cap remain intact.
So, mending that part or resoling a climbing shoe that has it’s sole thinned or worn out over time is urgent. It means to have the shoes in near fresh condition as a pair of resoled shoes offers more climbing mileage and performance akin to the new pair. You can get your climbing shoe resoled professionally or do it yourself. This article will discuss when, why, and how to resole climbing shoes as an extension of caring climbing shoes.
DIY Resoling Vs. Professional Resoler Service
Resoling thinned climbing shoe soles in a DIY method had been a vogue once. Now, with professional resolers proliferated everywhere, people tend to get the tricky job done by a professional resoler. But many climbers master the craft of resoling shoes as professional resoling takes time and digs their pockets deep. So when facing a debate like DIY resoling vs. professional resoling service, favoring one of the options would be tough. It is somewhat relative and worth considering several factors before voting for one as the right method.
Finesse and Sustenance
If you consider finesse of the task, you must opt for a resoling service where the expert will mend your sole by replacing it with utmost care and expertise. Moreover, professional resolers have the latest and most comprehensive collection of materials and tools to ensure the finest resoling. As for polishing the edge after gluing the new sole, a wheel grinder or power drill with sanding attachment is second to none, which may be a rarity for a DIYer. Not to end here, they have myriads of shoe lasts and rubber sheets in their collection to use the most appropriate one for your size and type of shoe.
So, if finesse and sustenance of the repair matter, you must go for professional resoling, and you don’t need to buy a climbing shoe resole kit in this case.
Time and Money
If you consider the time to wait until your worn-out shoe sole gets mended and shipped back to you, resoler service becomes the second consideration. And when you don’t have a professional resoler at a driving distance, it means more money and waiting time. You may not be ready for either of these two because the DIY method of resoling using a resole kit may accomplish the task in a day or two without spending extra shipping fees and time. Moreover, a resole kit and expertise on the craft will cost you far less than a professional resoling service.
To be specific, a resole kit should not cost you more than $40-50, whereas a resoling service without shipping will not cost less than $40-50 for a full resoling. And if there are more holes to mend in addition, the cost will increase though some resolers may bear the shipping fee when you require more than one repair – worn rand and holes to refill on top of resoling.
On the other hand, with a resole kit bought at $40-50, you may have several materials like glue or rubber patch left for next time. And a DIY effort using a resole kit will mend the sole to near new in a day or two.
Convenience
So far, convenience matters; it depends on the need and level of climber you are. If you are a pro climber, you may and should have more than one pair of climbing shoes. And it is no inconvenience to seek a resoler service from a distant city as you must postpone your climbing for you have climbing shoes sent for resoling.
Conversely, when you are just a beginner yet to master the art of climbing, you will invest less in equipment and try to do with a single pair of shoes. Being a novice, you will be too impatient to give a break in your climbing, so resole kit is convenient. You may fail once or twice, but it will not cost you extra money as the shipping charge does, and a few failed efforts will not kill your valued time as sending your shoes out or getting them shipped back do.
Needs of the Users
Resoling the shoes may make them tighter or looser than before. It depends on how the resoler wants the fit after the resoling. A DIY resoling is preferable in this consideration as the wearer can best tell what he needs. If the shoes had been overstretched by the time the original sole thinned, a tightening of the shoes in the course of the resoling would result in a better fit. Conversely, a professional service may not consider this scenario while replacing the overused or abused sole.
The result of the debate is a tie, as you cannot draw a clear-cut conclusion. If you have time to wait and money to spend extra or want to endorse the local business, resloer service is the better alternative with the fruits of finesse and expert mending. But if you don’t want to wait for days and have mastered the craft of resoling, a climbing shoe resole kit is the best bet.
How to Resole Climbing Shoes Using a Resole Kit: Step by Step Process
With all the conditions in its favor, you can decide for DIY resole option. In that case, you must avail the best climbing shoe resole kit on the market. Whereas this is the prime material to collect, there are several tools you have to use in the process of resoling your shoes. With the kit, crucial tools, and your manual dexterity and skill for accomplishing the resoling task in place, resoling your thinned shoe sole is water easy.
1. Gather the Kit and the Required Equipment
You will have a climbing shoe rubber sheet in the shoe stores, but you should go for one that is of superior quality, and that matches your shoe sole rubber. You can pick one of the following climbing shoe resole kits that already have earned the fame to be top-quality products.
- Five Ten Resole Kit
- Vibram Climbing Shoe Resole kit
- Stealth C4 Resole kit
- VERTICS.Shoepatch Repair kit
As for necessary equipment for weekend resoling venture, here you go:
- Climbing Shoe Resole Kit
- Hair dryer/Heat gun
- A pair of pliers
- Contact Cement (likely be available with resole kit)
- Putty knife
- Sandpaper/ Wheel grinder
2. Remove the Worn-Out Sole
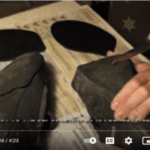
Start by disassembling your shoes as you have the resole kit and the required tools. Take a pair of pliers and remove the old sole. It may be easiest if you use a hair drier or a heat gun to heat the location to remove the sole. It is good to melt the glue first to separate the sole material from the shoe structure easily.
Now, use a putty knife to separate the sole successfully. This is a sensitive part as you have to separate the glued sole, hurting neither you nor the shoe.
3. Clean the Old Bits
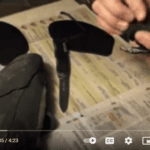
Once the old sole is turned off, you must clean the area on which the original sole was glued. Sandpaper can do the job with the desired result. You must take care that the shoe’s structure is in no way disturbed. Just clean the space of the old residues so that the new sole sits stubbornly.
4. Cut the New Sole
Now, it’s time to cut the rubber patch to the shape of the sole so that the new sole fits into the old spot. Take care that the new sole is a bit big or is an overhang by the edge. Because you can sand the overhang flush, but you cannot fill it up if it is smaller or falls short.
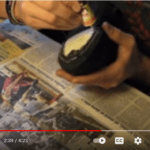
5. Glue on the New Sole and Resoling Spot
Contact cement is the best option to glue the new sole on and the shoe sole where to put it, and a standard resole kit will come with one. Read the direction on the contact cement that will suggest coating the sole and the exact spot to attach it. Then, wait a bit to let the glue dry a little.
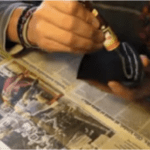
6. Press Both the Surface Together
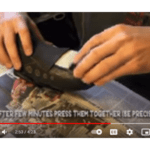
Now, press both the sole and the shoe bottom firmly together. A clamp is a better and more efficient pressing option in DIY resoling. Wrapping up the resoled part with scotch tape will do if you don’t have other option.
7. Sand Down the Edge (Overhang)
Once the gluing is over and the new sole has stuck stubbornly, let the contact cement get cured completely in several hours. Now, you have to sand the overhang or extra sole down to bring the original finesse or finish. You can do it manually or use any power tool like a drill with a sanding attachment.
Tips to Follow and Precautions to Take for Successful Resoling
It is already clear that diy resoling is not a better alternative but rather a choice. You can go for it if you are confident enough to do the job yourself. If your conditions suit a DIY resoling effort, the following tips and precautionary advice may be of immense benefit.
- You need to put two loads of glue on both surfaces but make a break of at least one hour between the glue coating.
- While removing the old sole and attaching the new one, ensure the heating is done at 80 degrees. This heat is very efficient in melting the glue both for putting this off and binding.
- Putting appropriate pressure after the gluing is crucial as less pressure will weaken the resoling. Professional resolers use a hydraulic press to ensure a biting bond. `
- It needs 8 hours of cooling down for the surfaces to settle down. Ensure you start sanding the rubber edges after that length of time.
- Use original rubber type to ensure durability and suitable thickness. Not having professional-grade exposure may put you into an ordeal in determining the suitable rubber type.
- While cleaning the chemicals and residues from the spot you have removed the old sole, ensure you dispose of them following due measures. Original manufacturing in a highly secure laboratory was not harmful to the environment. But you must ensure careful storage and disposal.
Final Words
A DIY resoling is a cheaper and faster alternative when you don’t want to wait longer than a professional resoling makes you do. But you must ensure two things are in place: a superior quality resole kit and the manual dexterity and skill the mending requires. Yes, you can do this.